Pixelmator Pro
Using Pixelmator Pro (MacOS) with the New Standalone RICOH THETA Stitcher for Z1
Quick Introduction
Hi, this is Toyo Fujita, I am a professional photographer and blogger and a long time user of RICOH THETA Z1. I run a business in Japan called IKOMA360 that supports businesses that need to use 360 degree photography. I create Virtual Welcomes for business websites and Google Street View and have wide experience with editing software for 360 degree cameras.
If you’re on a Mac, my recommendation is to use Pixelmator Pro coupled with the new Standalone RICOH THETA Stitcher to produce exceptionally high quality 360 degree images for business use.
Like this:
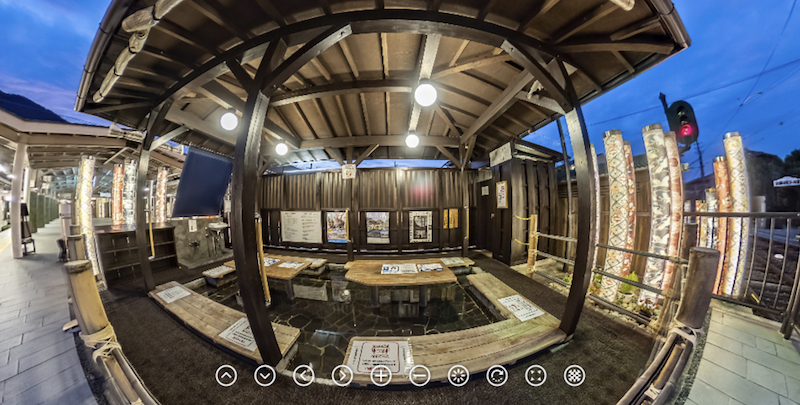
Photographed at Arashiyama Station Foot Spa, set to HDR-RAW with Ev at 0. Taken with the RICOH THETA Theta Basic app.
https://theta360.com/s/355ScW1WAul6dJLksrm45KgTY
Big News
RICOH THETA Stitcher ver. 3.00.0 is no longer a Plugin of Lightroom Classic. It's a standalone stitching software app designed for only THETA Z1.
When taking RAW images shot on the Z1 they need to be developed with RAW editing software such as Adobe Lightroom Classic. Then you stitch the images into a 360 image using RICOH THETA Stitcher. Originally, RICOH THETA Stitcher could only be used as a plugin for Adobe Lightroom Classic. This is a welcome change.
|
RICOH Official says, "Of course, we’ve received many requests to make RICOH THETA Stitcher a standalone app, so in response to such requests, we updated RICOH THETA Stitcher, and now you can use it without Adobe Lightroom Classic!" |
Main Workflow Sequence
High level, there are only 4 steps that you will go through:
- Take a picture with your Z1. Use RAW (DNG). It will be dual fisheye.
- Import into the photo editing software of your choice and edit and enhance as needed.
- Export as JPEG/TIFF. It will still be dual fisheye.
- Use the RICOH THETA Stitcher to stitch the image into JPEG/TIFF (8-bit or 16-bit) in equirectangular format. No longer dual fisheye.
But what RAW editing software works best with the Z1? In this article, I introduce Pixelmator Pro and show how to use it for editing Z1 RAW images. The app costs $39.99 and is available for MacOS only (requires macOS Mojave or later).
This article contains
- Introduction of Pixelmator Pro
- Develop RAW DNG images in Pixelmator Pro
- Export dualfisheye (unstitched) JPG images
- Stitch it in standalone RICOH THETA Stitcher
- Sample images
1. Introduction of Pixelmator Pro
Pixelmator Pro is a photo editing software for MacOS designed to enhance images using tons of tools, colors, highlight/shadow and more. It also offers RAW (DNG) development features, except HDR-DNG (16bit float) images captured in DFE/DFR.
You can grab it from Mac App Store, here.
Big news!! from the official blog. They've recently "completely rewritten" the PSD engine which is the part of the app that handles reading, opening, and writing PSD files. Pano2VR users are now happy.
|
|
|
Go to App Store on Mac and install. |

|
|
|
Launch Pixelmator Pro from Dock. |

2. Develop RAW DNG images in Pixelmator Pro
|
|
|
Go to menu and open files > select .dng image and click. |

|
|
|
ML (Machine learning) Enhance is a new, powerful tool in Pixelmator Pro. It is based on the MacOS Core ML engine. |

|
|
|
Adjust highlight/shadow manually or other settings . |

3. Export dualfiheye (unstitched) JPG images
|
|
|
You can export the image in TIFF (16bit) or multiple other formats. |

4. Start stitching with standalone RICOH THETA Stitcher
- RICOH THETA App Version Update Information (2021.08.24)
- RICOH THETA Brand website (2021.08.24)
Be sure you have the most recent version of RICOH THETA Stitcher. Previous versions were not a standalone application. In order to use RICOH THETA Stitcher as a standalone application you must update to v3.00.0.
|
|
|
Click icon to open Stitching window |

- You can change the filename as you like. e.g. "PANO_20210911_01"
- You can export the image to a different place from the original dng images' folder.
**In the cases above, you should select the original dng image after dropping it..
|
|
|
Drop the exported dualfisheye image. |
|
|
|
Apply "To zero" preset (Optional) and adjust Pitch/Roll/Yaw. |

|
|
|
Done!! |

5. Samples Images

Photographed at Arashiyama Station Foot Spa, set to HDR-RAW with Ev set to 0. Taken with the RICOH THETA Theta Basic app. https://theta360.com/s/355ScW1WAul6dJLksrm45KgTY
Example 2 - Photographed at Starbucks near Osaka Castle, EV set to 0.7. Taken with the RICOH THETA Theta Basic app. https://theta360.com/s/3yrL82juSVG0V05PmoMkFksl6
Example 3 - Shot after sunset before lighting, EV set to 1.0 (experimental) https://theta360.com/s/myLMiZ3qSJJwdnejnQMuTOx4C
Example 4 - Shot from a massage chair in a very clean laundromat, using EV set to 0 https://theta360.com/s/t4Hc1Hq2LE2nsDy1laWVWvO7M
Example 5 - Art exhibit - Beauty is all around 2021, Osaka, Japan. HDR (RAW) EV set to 0 https://theta360.com/s/2Uycok1OvBhSjhoS4kWK9efT6
Summary
Pixelmator Pro is one of the most popular and advanced photo editing software, similar to Lightroom and Photoshop.I am able to use it to easily take THETA Z1 images in RAW format, which includes excellent detail and clarity, import them into Pixelmator Pro to enhance and improve the images as needed, and now I can easily use the standalone RICOH THETA Stitcher to output a very nice 360 degree image.
This workflow allows more flexibility than ever before. It is especially useful for Google Street View, virtual tours, and other business oriented photography projects that require very high quality photos.
Opinions may vary.If you have any tools that you use and recommend, please let us know or post the article in theta360.guide. Thank you in advance.
Original sized images are in Google Drive shared folder.
https://drive.google.com/drive/folders/1Ue0K-aAX_6XSC0tmbMbyZwxOZHZVzOkZ
IKOMA360
Toyo Fujita