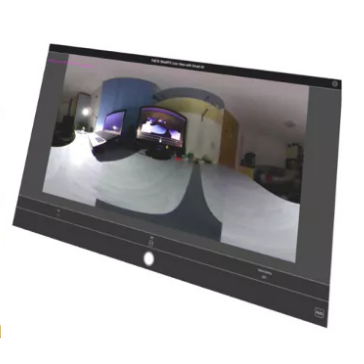
Live View with Smart AI
A Theta 360 plugin for providing live view over WebRTC, assisted with TensorFlow based object detection.

THETA V Plugin:
360° Live View with Smart Object Detection
Contact:
Attila Tőkés
Email: tokes_atti@yahoo.com
Archived Story:
Introduction
In this project I will show how I built the AI Assisted 360° Live View plugin for the Theta V camera.
The plugin provides 360° Live View functionality using WebRTC , and object detection using TensorFlow .
In a more advanced form, the plugin could be used to remotely assist personnel in different use cases , like for example in rescue operations .
The Theta V camera could be either wear by a person , or mounted on remote controlled vehicles like drones / rovers .
More about the project idea can be found here.
The source code of the plugin can be found in the GitHub repository linked to the project
A pre-compiled APK of the plugin is available here.
The plugin is in the process to being published in the Theta 360 plugin store.
Web RTC based Live View
The live view functionality is based the the WebRTC sample plugin.
shrhdk_ the author of the WebRTC sample plugin , describes the plugin’s functioning in the following article.
(note: the article is in Japanese, but Google Translate can be used pretty well to read it)
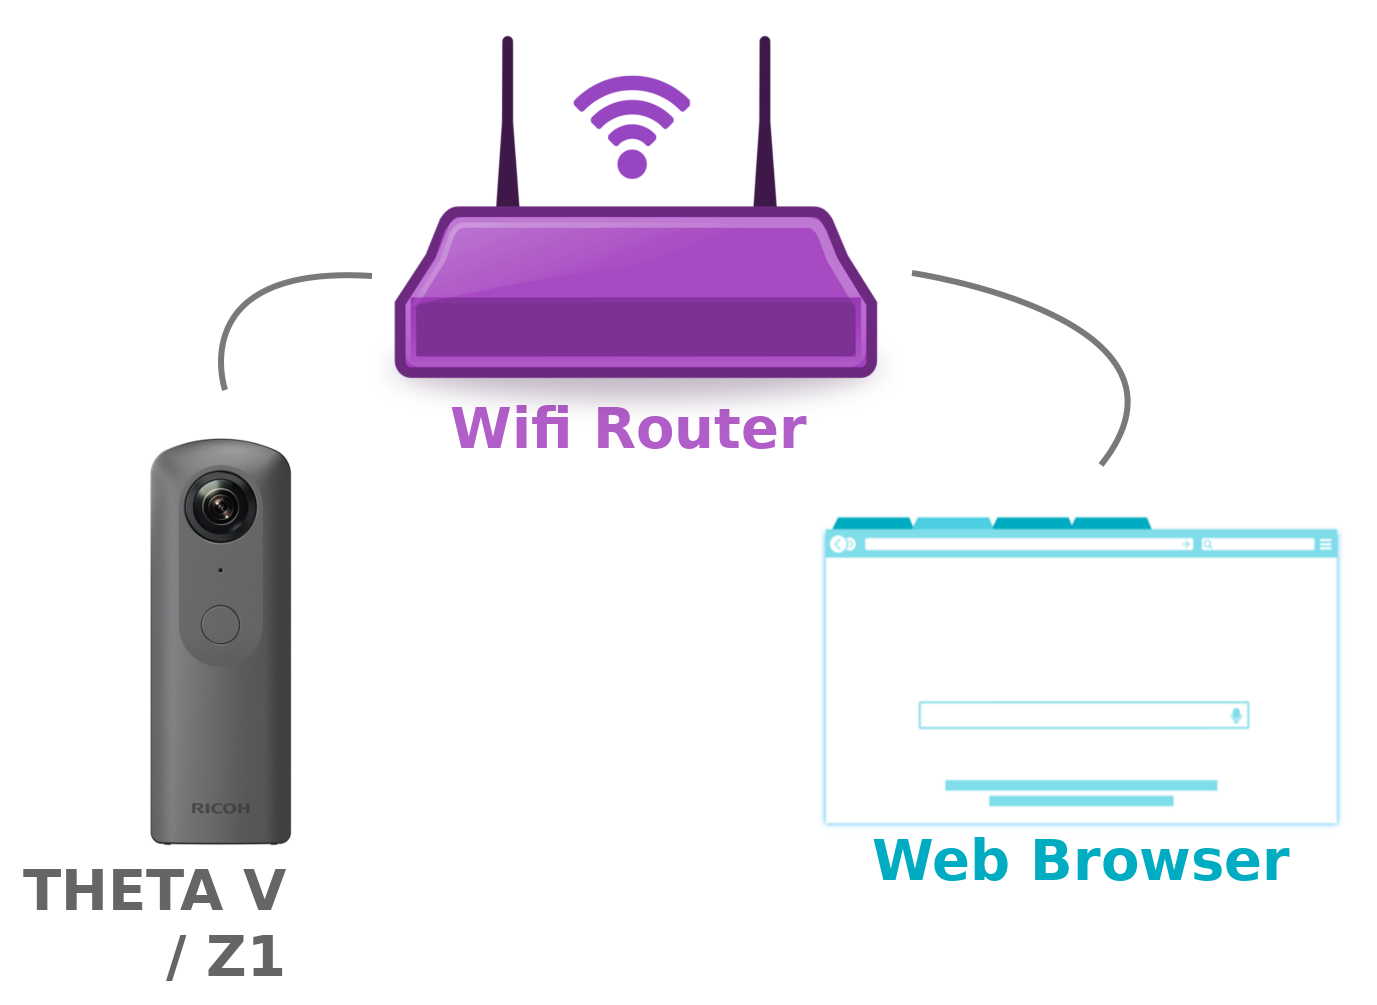
The plugin uses three communication channels with the web interface :
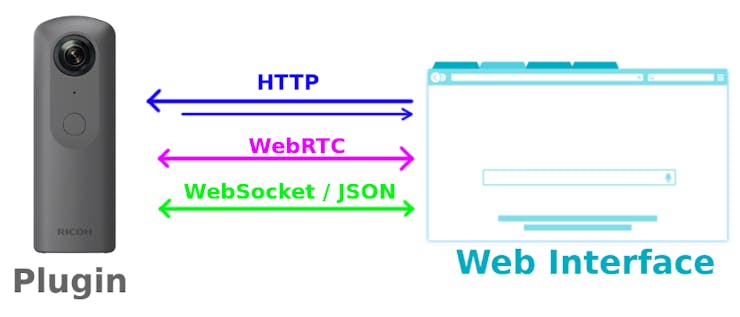
- a HTTP server is used serve the web interface and to provide control over the camera
- WebRTC is used for the for the video and audio live streaming
- a WebSocket connection with a JSON based protocol is used to negotiate the WebRTC connection details
TensorFlow based Object Detection
TensorFlow can be easily used to on the Theta V cameras. Craig Oda explains how to do this in the following article .
The source code can be found in the mktshhr/tensorflow-theta repository. This is basically a fork of the official tensorflow repository with the Android TensorFlow example packed into a Theta plugin and adjusted to work on the Theta V / Z1.
Building the AI Assisted 360° Live View plugin
The plugin was built using Android Studio :
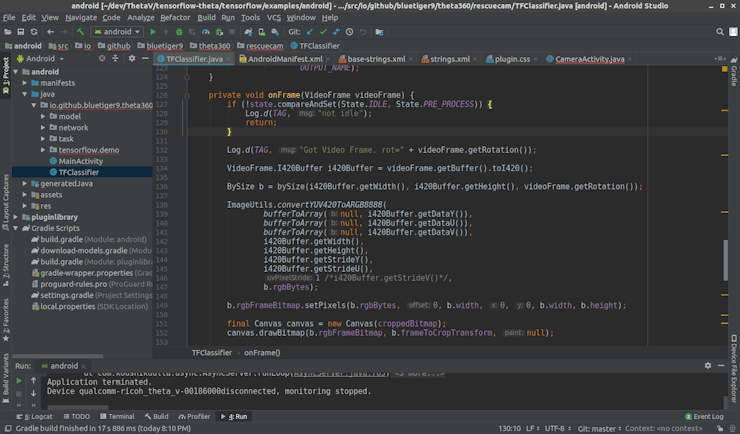
I started from the theta360developers/tensorflow-theta repository. I built the project and using Vysor I checked the plugin is working as expected.
The I added the WebRTC functionality from the ricohapi/theta-plugin-webrtc-sample repository. This also worked, so at this point I had a plugin with the WebRTC functionality and support for writing TensorFlow code.
The next step was to add TensorFlow object detection functionality over the WebRTC video streaming .
This was a little bit trickier as the the TensorFlow examples ( ClassifierActivity , CameraActivity ) used the Android Media API to capture images from the camera , while the WebRTC plugin used native video sinks and the two are not compatible.
To fix this from a created a new class TFClassifier with just TensorFlow functionality object detection functionality from ClassifierActivity , but not he media API part.
Next, I added to the WebRTC class a callback interface that can be used to get access to the camera’s MediaStream when it is ready.
public class WebRTC {
  ...
  private Consumer<MediaStream> mediaStreamCallback;
  ...
  public void setMediaStreamCallback(Consumer<MediaStream> mediaStreamCallback) {
      this.mediaStreamCallback = mediaStreamCallback;
  }
  ...
  private void setupLocalStream(...) {
      mLocalStream = mFactory.createLocalMediaStream("android_local_stream");
      ...
          if (mediaStreamCallback != null) {
              mediaStreamCallback.accept(mLocalStream);
          }
      ...
  }
Then we can use this interface to give the TFClassifier class a VideoTrack :
mWebRTC = new WebRTC(this);mWebRTC.setMediaStreamCallback(mediaStream -> {
   Log.d(TAG, "Got Media Stream: " + mediaStream);
   new TFClassifier(mediaStream.videoTracks.get(0), getAssets(),
           ...
           });
});
To the VideoTrack we can then in TFClassifier add a custom VideoSink :
public TFClassifier(VideoTrack videoTrack, ...) {
   ...
   videoTrack.addSink(this::onFrame);
   ...
}

private void onFrame(VideoFrame videoFrame) {
   ...
}
The VideoFrame we get here, with a little bit of image processing magic, can be converted to the Bitmap needed by TensorFlow :
private final Map<String, BySize> bySize = new HashMap<>();private static class BySize {
   final int[] rgbBytes;
   final int width;
   final int height;
   final int rotation;
   final Matrix frameToCropTransform;
   final Bitmap rgbFrameBitmap;
   BySize(int width, int height, int rotation) {
       this.width = width;
       this.height = height;
       this.rotation = rotation;
       rgbBytes = new int[width * height];
       rgbFrameBitmap = Bitmap.createBitmap(width, height, Bitmap.Config.ARGB_8888);
       frameToCropTransform = ImageUtils.getTransformationMatrix(
               width, height,
               INPUT_SIZE, INPUT_SIZE,
               rotation, MAINTAIN_ASPECT);
   }
}

private void onFrame(VideoFrame videoFrame) {
   ...
   Log.d(TAG, "Got Video Frame. rot=" + videoFrame.getRotation());
   VideoFrame.I420Buffer i420Buffer = videoFrame.getBuffer().toI420();
   BySize b = bySize(i420Buffer.getWidth(), i420Buffer.getHeight(), videoFrame.getRotation());
   ImageUtils.convertYUV420ToARGB8888(
           bufferToArray(null, i420Buffer.getDataY()),
           bufferToArray(null, i420Buffer.getDataU()),
           bufferToArray(null, i420Buffer.getDataV()),
           i420Buffer.getWidth(),
           i420Buffer.getHeight(),
           i420Buffer.getStrideY(),
           i420Buffer.getStrideU(),
           1 /*i420Buffer.getStrideV()*/,
           b.rgbBytes);
   b.rgbFrameBitmap.setPixels(b.rgbBytes, 0, b.width, 0, 0, b.width, b.height);
   final Canvas canvas = new Canvas(croppedBitmap);
   canvas.drawBitmap(b.rgbFrameBitmap, b.frameToCropTransform, null);
   ...
Note: that the VideoFrame cumming may not always be the same size , as the plugin may switch between different resolutions . The BySize sub-class is a helper structure used to cache structures for each resolution.
Then we can run image recognition on the obtained BitMap ;
public TFClassifier(...) {
   ...
   classifier =
           TensorFlowImageClassifier.create(
                   assetManager,
                   MODEL_FILE,
                   LABEL_FILE,
                   INPUT_SIZE,
                   IMAGE_MEAN,
                   IMAGE_STD,
                   INPUT_NAME,
                   OUTPUT_NAME);
}

private void recognize() {
   final long startTime = SystemClock.uptimeMillis();
   final List<Classifier.Recognition> results = classifier.recognizeImage(croppedBitmap);
   long lastProcessingTimeMs = SystemClock.uptimeMillis() - startTime;
   Log.i(TAG, String.format("Detect: %s (time=%dms)", results, lastProcessingTimeMs));
   ...
}
Because the image recognition can be time consuming (~100+ ms) it is ran on a separate thread (Android Handler / HandlerThread ). When a new frame arrives, it is pre-processed , the job is passed to a Handler in which the image recognition is done.
private void onFrame(VideoFrame videoFrame) {
   if (!state.compareAndSet(State.IDLE, State.PRE_PROCESS)) {
       Log.d(TAG, "not idle");
       return;
   }
   ...
   handler.post(() -> {
      if (!state.compareAndSet( State.PRE_PROCESS,  State.PROCESS)) {
          Log.d(TAG, "not pre-process");
          return;
      }
      recognize();
      if (!state.compareAndSet(State.PROCESS, State.IDLE)) {
          Log.d(TAG, "not process");
          return;
      }
   });
To avoid over-loading the Handler thread, when the image recognition is still running for a frame , any new frame is dropped . This way the image recognition may run at lower frame rate compared to the live video stream , but it remain be up to date instead of getting delayed.
The result of the image recognition is passed to a callback :
private final Consumer<String> detectionCallback;

private void recognize() {
   ...
   final String json = new Gson().toJson(results);
   detectionCallback.accept(json);
}
Then, in the MainActivity class, the result is sent to the web interface , over a WebSocket connection using a custom-type message:
new TFClassifier(mediaStream.videoTracks.get(0), getAssets(), detectionJson -> { mWsClient.send( "{ \"type\":\"tf-detection\", \"data\" : " + detectionJson + " }"); });
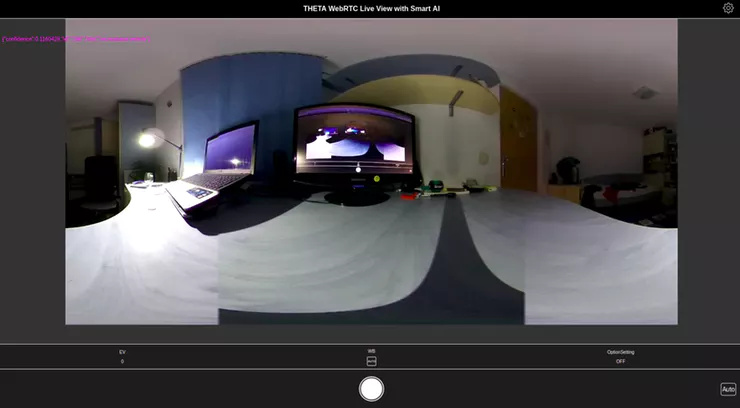
On the Web Interface size, right now the result is just displayed over the video stream in a RAW form on a Canvas .
webSocket.onmessage = function(evt) {
   console.log('WebSocket onmessage() data:', evt.data);
   let message = JSON.parse(evt.data);
   switch (message.type) {
   ...
   case 'tf-detection': {
       console.log(message);
       ctx.fillStyle = "#ff00ff";
       ctx.font = "12px Arial";
       let y = 50;
       for (var i = 0; i < message.data.length; i++) {
           let text = JSON.stringify(message.data[i]);
           ctx.fillText(text, 10, y);
           y += ctx.measureText(text).height;
       }
       break;
Future Work
Note that the plugin is still in a PoC / Beta / phase and can be improved a lot.
The enhancements I plan to do are:
- a much better User Interface
- TensorFlow models that also provide location data of the recognized objects , so that these can be show on the live stream
- multi box detection - currently the camera image is scaled / cropped before the image recognition is done
- support to use for custom TensorFlow models provided by the user
- OpenCV based image filtering / pre-processing
Enjoy!
bluetiger9/theta-live-view-with-smart-ai
Modified TensorFlow example for THETA V (Android). This is forked repo from https://tensorflow.org - bluetiger9/theta-live-view-with-smart-ai